Saturday, July 30, 2011

My First ROAST BEEF


This will be our first beef post. I am guessing since beef is more expensive than chicken (our favorite by far in # of postings) that we opted not to cook as much of this ingredient.


I am by far not an expert at cooking beef. If you ask me, I can only say I am an intermediate cook- I have some knowledge but less likely to enter a "masterchef" kind of thingy. (most of my knowledge comes from watching all those cooking shows)


So, let's talk beef.


The only way I can eat roast beef is when I go to hotels and they have a buffet. The concept of making one in actuality was really far from my mind. It's a challenge but I was thinking it would be hard. (like trying to run 21k~ which I still haven't mustered the guts to do... yeah, I love to cook and eat!~ running needs a person to be thin!!!)


The first thing was finding a recipe. I got one thru an free application on my iphone. Foodnetwork application. (really helpful) You can search by ingredient and a list of all recipes comes up. You can choose the ones you like and click add to my recipes and it gets automatically  added. You can go back to the my recipes icon and view all your recipes quickly. AAHHH... the wonders of technology!! Don't you just love it? So here's my first roast beef recipe:


Beef Tenderloin with peppercorn sauce


2 pounds beef tenderloin (900grams)
1 tsp dry oregano leaves crushed
1 tsp coarse salt
1 tsp black pepper, crushed
1 clove garlic, chopped
1 tsp dry thyme, crushed
1 tsp paprika (I used spanish paprika since it was what I had)


Peppercorn sauce


1 1/2 cups Marsala wine  (you can use red wine here.. I had left over marsala wine from doing the  chicken marsala.. )
1 cup chicken broth (used chicken bouillon diluted in hot water)
1 clove garlic, chopped
10 whole peppercorns (I think I used more than 10- had some nice red/ green ones on hand)
1 cup whipping cream
2 tsp dijon mustard ( I only had french- so I used that)
salt and pepper, to taste


heat oven to 425F (about 210C)
combine all the dry ingredients in a bowl.


For the tenderloin, make sure it has no more white slivers (ask your butcher to take them out) They are the sinews and might make your meat chewy and tough.
Rub the dry ingredient all over the tenderloin and place in rack on a roasting pan.


Place meat thermometer in the center of the beef. Do not cover or place water at the bottom. Allow the roast to cook to 35-40 minutes for medium rare


When the meat thermometer reads 135F (mine actually read more than that~ I just went by the time given) remove roast from oven and cover with aluminum foil and allow to sit for 10 minutes. The temperature will rise to 145F. transfer roast to carving board (I had none) and let rest for another 5-10 before slicing. Cut into 1/2 inch thickness


while the meat is resting, you can make your peppercorn sauce. Put the roasting pan over a flame. Add wine, broth, peppercorns and garlic and bring to simmer until liquids are reduced. (the original asked you to simmer 20 mins... I was afraid my liquid will be all gone so I went by sight and it turned out about only 6 minutes or so). add the cream and mustard and simmer while stirring for another 6 minutes or until the sauce thickens and is reduced again. Season to taste.
bubbling away...
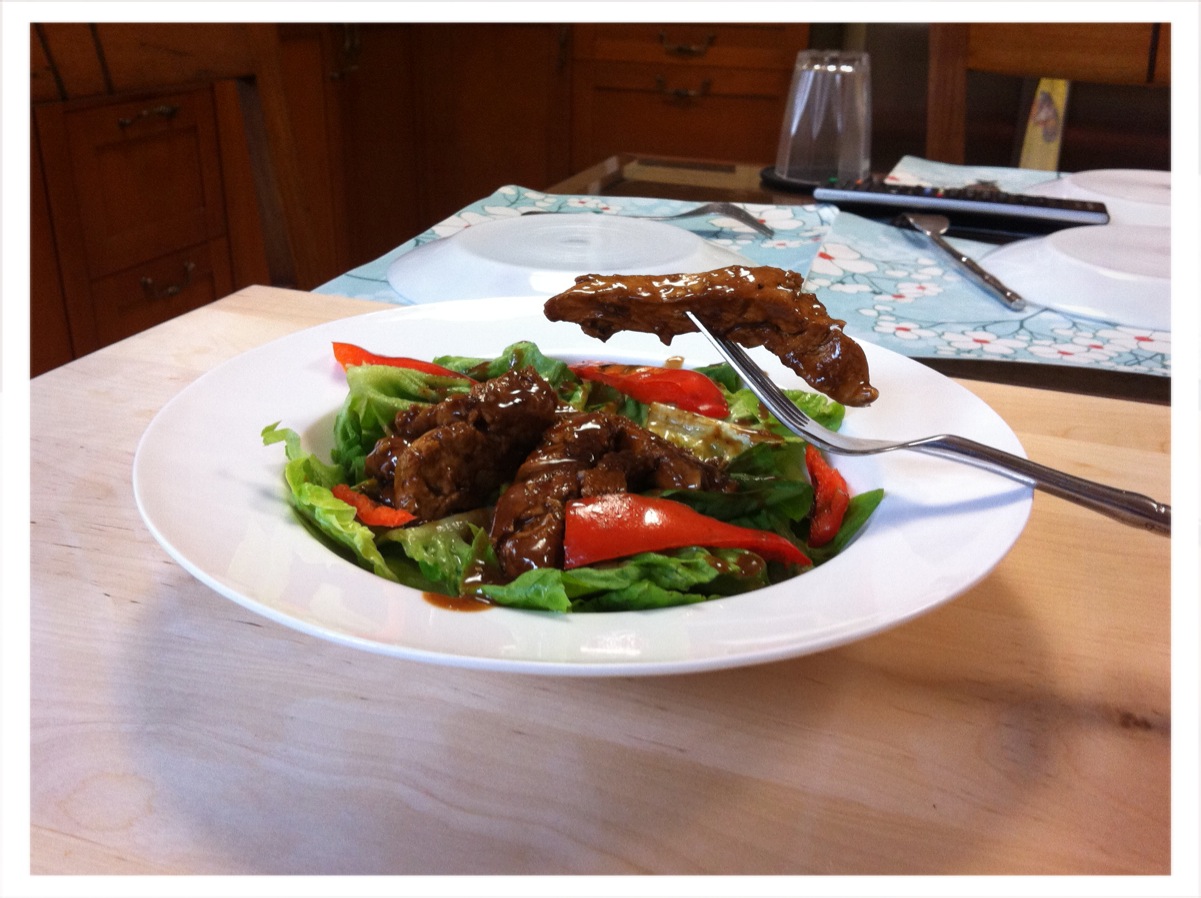
I was honestly amazed at how perfectly done it was when we sliced it. just the right color!


yummy!
Notes on this: You have to time this to more or less what time you will serve. I had to wait for 20 minutes for my husband to come home so I out the roast back into the oven. (I did not turn it back on--it was still hot). The sauce was actually more than we could consume for the totality of the roast. (unless you REALLY like a lot of sauce, the amount of sauce generated was a lot. either that I  didn't reduce enough)... oh well, the taste of the sauce was good though. peppery and creamy just what a peppercorn sauce should be! (I was thinking if I reduced too much, it might become too salty since the sauce was ok at this point..)


This is actually quite easy to make (to my surprise).. the only hard part is the measuring of the dry ingredients. It one of those things people think you slaved over but actually didn't! hahaha. 


I also should note that the SMELL of the kitchen when you put this in the oven is soooooo good! I was convinced it was going to be delish just by how the kitchen smelled while it was roasting. Even my 11 year old son came down and asked, "What smells so delicious?"(my ears were flapping when he said that). The TASTE ~ it was tender (ok....so I used tenderloin). But the doneness was just how we liked it. Kind of medium well done with a little pink on the middle. (too well done and the meat becomes really tough and dry). I wish I had the stomach to consume all that meat.. we had some leftovers that hubby brought to work the next day with a side salad (still yummy)- my sister in law even asked if it was store bought (yipee hurray! ear flap ear flap!!)


with all the compliments I got from this... I AM SURE YOU should try this! Happy cooking!

Tuesday, July 26, 2011

Pancake Parfait

How to cook a perfect pancake.

This blog post is more of a technique rather than a recipe.  We all have our favorite brand or recipe for pancake but I learned this way of cooking pancakes from the Japanese, and man does it work!!!

Basically how you want your pancake is to be is evenly cooked, no burnt edges, fluffy and moist!  Depends on your preference, you can have thick or thin pancakes.


To start off you need:

pancake batter
non-stick teflon pan
cover for your pan
wet cloth

My favorite brand of hotcake mix is Maya.  I've actually NEVER made hotcake from flour, I don't know a good recipe for it and Maya seems to be just delicious!

Start off by heating your pan on high heat.  Once the pan is hot, press the bottom of the pan on a wet cloth to cool evenly the bottom.


Not for health reasons or anything, with a teflon plan, you don't really need butter, but you can also do so, but make sure it's not too much.  What I do is I melt the butter on the pan and wipe it with tissue paper to evenly coat the pan.

The goal here is to make sure that when the batter touches the pan, it will not cook the edges right away, making the heat even all over until you're finished pouring in the batter; if you skip this step, then you'll end up with a hotcake looking like this:


Burnt edges and uneven cooking of the pancake.

Put the pan back into the pan, turn the fire to medium low heat then slowly pour in the batter.  Wait for a little while til the hotcake bubbles up, that's when you know the other side is done.


At this point, you can flip it, and voila!


After flipping it, you just need to cover it til the bottom side is done to keep the moisture in then you're done!

Put butter, peanut butter, slices of bananas and pancake syrup! :D  Enjoy!

Monday, July 25, 2011

Corn and Cheese Chowder

Cheese.... corn.... chowder. These three words conjure up images of comfort food galore. This is also one of Micheal Smith's recipes. In the original, he used cornmeal... but since I don't know where the heck I'm going to find cornmeal, I substituted breadcrumbs. (mine were kinda rough cut because I made them myself.) see below how to make---


Traditionally, we associate the word chowder with clams or boston. But since clams around this parts are not that trustworthy, I opted to make a cheese and corn one, care of Micheal Smith.


Ingredients

  • 8 slices bacon, chopped
  • 2 large onions, peeled and chopped
  • 2 stalks celery, chopped
  • 4 cups milk
  • 1 cup 35% heavy whipping cream
  • 2 tablespoons breadcrumbs
  • 4 ears corn, kernels removed or 4 cups of frozen corn (whole corn not creamed corn)
  • 1 bunch parsley, chopped
  • Salt and pepper to taste
  • 1 cup or more of shredded cheddar cheese
Directions


  1. Cook the bacon in a soup pot over medium-high heat until it is crisp and brown.(anything with butter or bacon ALWAYS tastes goooood..... as one chef told me, fat is GOOD... it is the one that give flavor to the dish)
  2. Drain away about half of the fat (i think they thought half the fat would be better than using ALL of it..hahaha) in the pot then stir in the onions and celery. Sauté for a few minutes until the aromatic vegetables soften.
  3. Add the milk and cream and heat through. 
  4. Sprinkle in the breadcrumbs and stir well until the soup thickens slightly, about ten minutes.at this point, I added a bit of canned salmon, just to see how it will turn out.
  5. Add the corn and continue cooking just long enough to heat it through. Stir in the cheese.
  6. Taste then season as needed with salt and pepper. Stir in the parsley just before serving.
By the time the dish is done, the cheese would have melted really well and it would have turned REALLY thick. You can serve it as is but if you plan to serve it again, I suggest to add some water to it. (it thickens some more in the reheating). The heartiness of this soup is enough to fill you up (a meal in itself!) The breadcrumbs also added a surprise texture to it.
Remember the chowder you get in a bread bowl? You eat the chowder and you get bits of bread with each bite of the soup. THIS reminds me of that. I also liked the crunchiness of the corn with the burst of sweetness-- YUM!


This would be perfect for a cold rainy night, with a nice cold something (fill in the blanks for your choice of drink). It easy to do and you can always experiment on what to put!


Breadcrumbs: use day old bread, toast in toaster or oven till brown- put in your blender or food processor and mix till shredded. store in an airtight container till needed. (see, the old bread has some uses too! =))

Thursday, July 21, 2011

Resto Review: Vikings Luxury Buffet

This is my first attempt on a restaurant blog review.  I am such a critic!  Fashion, clothes, food and what not-- everything I know something of, I can comment. haha

Victim:  Vikings Luxury-Buffet


According to their facebook page:
Vikings luxury-buffet restaurant is stylish, relaxed and fun; it overlooks the majestic Manila Bay through vast conservatory-like windows. The first of its kind in the Philippines, the tasteful 600-seater dining room, possess well appointed details, comfortable dining nooks while incorporating several live-action-cooking stations and a level of food quality beyond buffet expectations; from prime seafood to prime rib, gourmet pizzas to local favorites and freshly made stir-fried options thrown in; truly an epicurean epiphany.

Vikings redefines the whole notion of buffets, with sumptuous feasts of delectable European, American, Japanese, Chinese and Filipino dishes. Vikings focuses on freshness, high-quality ingredients, comforting-unique choices and providing an impeccable dining experience worth coming back for. Vikings is the perfect place for tourists, special occasions, family gatherings and corporate events. Open for breakfast, (Saturdays & Sundays) lunch and dinner 7 days a week. 

Vikings redefines the whole notion of buffets, with sumptuous feasts of delectable European, American, Japanese, Chinese and Filipino dishes. Vikings focuses on freshness, high-quality ingredients, comforting-unique choices and providing an impeccable dining experience worth coming back for. Vikings is the perfect place for tourists, special occasions, family gatherings and corporate events. Open for breakfast, (Saturdays & Sundays) lunch and dinner 7 days a week. 
For those who have not been there, in short, Vikings is just like any other hotel buffets sans the hotel -- and so much cheaper! Weekday lunch is at 688++, Weekday Dinner and Weekends is 888++.  It is really cheap for the amount of food they serve.  It is actually very impressive because it is not only eat-all-you-can, it's also drink-all-you-can!  Not just soda or juice, even beer!  What a treat!

I was with a couple of friends last night and we were saying that if you just came to Vikings to get drunk, 888++ isn't actually too expensive, and it's as though you have free food!  What great deal!

Ambiance 

The ambiance of the place is impressive.  They really wanted to establish that they are a luxury buffet.  It's like taking the hotel out of a hotel restaurant equation.  The cutlery were classy, the heavy kind.  The plates were simple but elegant.  The interior was lavish and grand, I don't think they spared anything to make sure it looks class.
Service

After just opening a few months, the outdoor area is already under construction to make it airconditioned to accommodate more guests!  Speaking of more guests, getting in there is a bit difficult.  You would have to call in advance to reserve for seats and we did.  My sister called their trunklines: 846-3888 / 846-4888 / 846-5888.  The lady on the phone was nice and all, even reminded us that we should be there before 7PM because the reserved seats will be automatically cancelled and given priority to walk in's.

Come 6:50PM we were there, and they couldn't find our reservation.  They said wouldn't have accepted any reservation that morning because they were already full a week ago.  We couldn't argue with them because we did not ask for the name of the person we talked to on the phone.  Realizing it was going to be a useless argument, we stopped forcing and placed our name on the waiting list.  At exactly 7PM, we were told that we might get a table after an hour-- but thankfully, we didn't have to wait that long, we were showed to our table by 720PM.

What pissed me off a little bit was the somewhat arrogant demeanor that the ladies in the front desk possessed, which is very typical way for people to act when they become popular -- not just in terms of restaurants, but anyway, they weren't totally nasty but you can definitely smell the arrogance.

The next bad thing that happened to us in Vikings, while my sister and I were waiting for 2 of our friends to come, a waiter came and just took  one of the empty chairs away, as if we weren't there! wtf?!  No permission, no glance, no nothing!  We immediately called his attention and complained!  They said sorry thinking we were mad because they didn't ask permission, then took the chair away again! and we had to say again that we're waiting for people to come!  gawd.

Wanting to accommodate more people, they squeezed in a group of like 12 people into the booth beside us!  For them to be able to get food, they all had to stand up as though they're all in the movie theater so that the person in the middle can leave the table.  What a hassle.

Food

We found out from a friend who works as a chef in Vikings that this was owned by the owners of President Tea House in Chinatown!

It was no wonder that the food I most enjoyed were the Chinese cuisine!  Normally, when I go eat at Circles, Spiral, Heat or wherever, I ignore the Chinese section, because Chinese food is very difficult to cook-- or at least cook well.

Japanese sushi bar is good, their salmon sashimi is wonderful!  My sister had the Sukiyaki, the soup was-- not good, and the beef was tough.

I tried their Paella Negra -- not so good, the paella wasn't black enough with the squid ink, I think it has too much nutmeg in it.

I also had the Cheese Beer Soup -- I know!!! cheese--good, beer--good, cheese beer soup? interesting! I can't say I hate it, can't say I like it too.

Their steak counter, they limit to giving you 4 slices of meat per person to control the portion of the food.  After cooking the 4 small slices of meat, it comes out from the grill as if it's beef tapa or something, it becomes really small and the size seems a bit ridiculous if you wanted to eat steak; but I guess it's ok because the steak was over cooked anyway, I would've just wasted a lot of meat.

For dessert I had a slice of black forest-- it was ok, it was generous with cherries and the cake was moist.  I also chose the red velvet cake-- I plan to try all red velvet cakes I encounter upon!  It was like made out of a mixture of flour and rubber, i don't even know how they got the consistency.  Their vanilla yogurt was delicious, it could be too sweet for some people, but I liked it -- they also had crushed grahams! yum.  They did have an abundance of fresh fruits also which was good.

Basically, that's it, that's how I judge a restaurant, the service, ambiance and food of course.  Don't take my word for it though, try it out, you might like it!  I'd probably go back if I plan to get drunk and have all the draft beer that  I want but to go back for food? No thank you.

Wednesday, July 20, 2011

Chinese Chicken Salad

If you haven't guessed, I LOVE watching the food network. These people make cooking look so easy. Of all the people who have shows, one of my favorites is INA GARTEN or The Barefoot Contessa. (the other is Micheal Smith) If you look at her, you can see she really relishes her cooking and entertaining in her home. As my husband quipped, "don't trust a THIN cook" - ahahaha (take that! Giada de Laurentis... hahaha, you ever wonder how she keeps eating pasta and cheese and still keep sooooo thin???? and you look at her face when she tastes what she cooks and she just ummmmss her way thru it. )


Anyhows.... here is Ina's chinese chicken recipe which I tried. I played around with the ingredients and the cooking because I didn't have everything available.


I also revised this as a salad (Ina made it with asparagus) for ths original recipe, click here


Ingredients

  • 4 boneless chicken breasts
  • Good olive oil
  • Kosher salt
  • Freshly ground black pepper
  • 1 head lettuce
  • 1 red bell pepper, cored and seeded

For the dressing:

  • 1/2 cup vegetable oil
  • 1/4 cup good apple cider vinegar
  • 3 tablespoons soy sauce
  • 1 1/2 tablespoons dark sesame oil
  • 1/2 tablespoon honey
  • 1 clove garlic, minced
  • 1/2 teaspoon peeled, grated fresh ginger
  • 1/2 tablespoon sesame seeds, toasted
  • 1/4 cup smooth peanut butter
  • 2 teaspoons kosher salt
  • 1/2 teaspoon freshly ground black pepper


Preheat the oven to 350 degrees F. (I actually did not roast it in the oven, but rather used a griller- the George Foreman griller-- preheat it)


Place the chicken breasts on a sheet pan (I actually pounded the chicken with a mallet first, to make it more even)  and rub with the skin with olive oil. Sprinkle liberally with salt and pepper. Grill for 20-25 minutes, until the chicken is  cooked. Set aside until cool enough to handle.  Slice the chicken in large bite-sized pieces. Grill the peppers for 5 minutes.


 Whisk together all of the ingredients for the dressing and pour over the chicken. cut the lettuce into bite size pieces and arrange in a bowl.Place the chicken on top and drizzle some more sauce.


Tip: Reheat in microwave if you plan to eat later, as the sauce will get really stiff (I think the peanut butter has something to do with this) Also, arrange the chicken on top of the lettuce when you are ready to serve, to prevent the lettuce from wilting.


The day after you cook this, if you have leftovers, you can make a sandwich by placing lettuce over a piece of bread and topping the chicken on it. Pack extra napkins as it is a bit oily from the peanut butter sauce. If you like your peanut butter... this recipe is for you. and it is still good the day after! (doggie bag!!!!)

Monday, July 18, 2011

Spiked Tiramisu - Candie Version

The first time I've ever heard and tasted Tiramisu was when I was in Japan.  Naturally, I thought Tiramisu originated in Japan because it sounded Japanese.  Tiramisu literally means "pick-me-up" in Italian, the reason being the ladyfingers being dipped into really strong espresso coffee.


Tiramisu traditionally also has fresh eggs in them, but the recipe I found did away with the eggs.  Basically, like any recipe in the world, you can recreate it to suit your taste.  Whether you want it less coffee, more rum, less cream, more cheese, it's really up to you, but I follow the guidelines of Laura Vitale's recipe to create my Tiramisu.

1 lb of Mascarpone Cheese, softened
1-1/2 cup of heavy cream
1/3 cup granulated sugar
1 tsp of vanilla
2-1/2 cups of espresso, cooled
2 tbsp dark rum
unsweetened cocoa powder
~30 pcs of lady fingers

In a large bowl whip the heavy cream and set in the fridge until you are ready to use it (cream stays stiffer longer if  kept cold) .
In a large bowl cream together the mascarpone, vanilla and sugar, fold in half of the whipped cream into mascarpone mixture to lighten. Fold in remaining whipped cream being careful not to over mix.
To assemble, in a large bowl mix together the coffee and rum and set aside, also have ready the cocoa powder and ladyfingers. Have a 9 by 9 square baking pan ready to start assembling. Dip each ladyfinger into the coffee mixture and lay in the bottom of your pan, once the whole bottom of the pan has the coffee and rum soaked ladyfingers ready pour over half of the mascarpone and cream mixture, spread evenly over ladyfingers and sprinkle the top with 1 tablespoon of cocoa powder.
Arrange the remaining coffee soaked ladyfingers on top of the layers and spread over the remaining filling. Sprinkle with the remaining 1 tablespoon of cocoa powder.

Cover and chill for 4 to 24 hours before serving.

As I say, third time's the charm, I made this recipe 3x and I got the perfect taste for me the 3rd time around.  Here's what to watch out for:
  • Measure, Measure, Measure! at first I forgot to measure my cream and my first tiramisu ended up being really creamy.  Depending on your taste, don't put too much of the creamy mixture.
  • Freeze! Cheese Police! depends on what you like, i used Cream Cheese instead of Mascarpone, not only they're hard to find, they're a bit expensive too.
  • Rum, Rum, Rum! I like my tiramisu spiked!
  • Coffee is not espresso!  You do not dip the lady fingers in coffee because it's already been diluted with water, to get perfect espresso, order it from Starbucks!
  • Not all lady fingers are made equal! Look for a good brand lady finger, try dipping it in milk then eating it soggy, that's basically the texture it'll have when you finish the tiramisu; you want it smooth with no lumps.  Laura recommends Savogliardi brand of lady fingers.
I hope you enjoy this recipe and let me know how it goes! :D

Friday, July 15, 2011

Tiramisu- Disney version


I must say, TIRAMISU is probably one of my favorite desserts. There are just so many ways of making it and just as many ways people prefer to eat it.


This is the first time for me to make tiramisu and I was a little apprehensive on how it would turn out. First of all, there is the "what recipe do I use?" question. there were several that I researched and all with different levels of difficulty. In the end however, since as I said, this will be my first tiramisu. I chose a relatively easy recipe. (Anna Olson's complicated one for next time) ----where is the recipe from? Its from a free handout from Rustan's supermarket. Honestly, I keep mentioning Rustan's so much in my posts that they need to pay me for the endorsement! hahaha


You'll need


8 medium eggs, separated
1 cup sugar
1 pound mascarpone (about 500grams or 2 tubs)
1 cup brewed coffee
1/3 cup rum (optional)
25 lady fingers (approx)
cocoa powder for dusting
chocolate (for shaving-- I added this part)


In a bowl, combine egg yolks with the sugar, Using a handmixer, blend on high speed for 3 minutes. Add mascarpone. (one thing about mascarpone is that you can't really find it readily on every supermarket shelf, like say, cream cheese. I could only find it in Rustans or maybe if I tried, Santis. the last time I was in Rustans, I couldn't find this. Landmark supermarket has a wide selection or maybe S & R... you can try there too)  beat for another 2 minutes, or until the mixture is uniform and creamy. set aside (I put mine in the refrigerator)


In a clean bowl, beat the egg whites until stiff peaks form. (maybe 3 minutes). Gradually fold in the egg whites into the mascarpone mixture. (you should do this gently, to maintain the airiness of the whipped egg...) I try to not over mix it too... a few swivels of the spatula was good for me. At this point, I kept asking myself if this was actually the way this was supposed to look, but I kept going.


prepare the coffee and pour into a shallow dish. I was thinking if I should put the rum in or not, since I was serving this to my kids. I opted to put just a tinnie bit... like 1 capful (as in the cap of the rum bottle) in the cup of coffee. One by one, dip the lady fingers in the mixture and layer into your 8-inch square dish. I try to not leave them too long in the coffee as they might get too soggy or the coffee flavor will get too powerful my kids won't eat it. spread a thin layer of mascarpone cream on top, followed by another layer of coffee dipped lady fingers. Continue until you have 3 layers and finish with the cream.


use a small sieve (I learned this watching all those shows on TV), put a tablespoon of cocoa powder and dust the top. For added bonus (this is optional if you don't have chocolate on hand) shave some chocolate on top too (you can use a cheese shredder and some hershey's chocolate if you don't have bittersweet)


the cream is spilling over!


So, here is the verdict.


My single friends thought the Tiramisu lacked punch (as I said, not much rum in it) while my friends who has kids absolutely loved it. I actually thought it tasted very tiramisuey...the texture was very light and the sweetness was just right. My friend Vivian actually asked for seconds (I sent her some) -


Candie said the brand you use for the ladyfingers  has taste and texture difference and recommended Eng Bee Tin. I might try it next time I make this. If you like an airy and not so alcoholic tiramisu... this is the recipe for you. For a tiramisu with a punch, you might want to try Candie's version - she will post it soon.

Wednesday, July 13, 2011

Hi Hi Lemon Meringue Pie (Pie Crust)

My mom recently heard that lemons can prevent fatty liver if you drink juice of 1 lemon everyday for 10 days.  So she bought lemons and left it in the fridge. haha

If life hands you lemons (in my case, if your mom hands you lemons), make lemon pie!  Lemon Pie isn't really something I crave for like the way I would, with say, chocolate cake.  Lemon pie is nice once in a while, when you've eaten too much flavorful food and would like to clean your palette.

I got this recipe from YouTube, as usual.  I've seen a few different videos but I liked Betty's recipe the most.  Her pie looked delicious and easy to make. Not only did she describe her lemon pie to be "to-die-for" but she also pronounces the word "pie" in a soft American Southern accent: pha. haha.


There are 3 components to this, the LEMON filling, the MERINGUE top, and the PIE crust.

We should start off from the base, which is Betty's Press-in Pie Crust.  You can watch her video here.  This is pretty much the same as the Short Crust Pastry I made, the difference is that you don't need to refrigerate it, you just press it on the pie plate.


Ingredients:

1 cup All purpose flour
1 tbsp Confectioner's Sugar
1/2 tsp salt
6 tbsp COLD butter, diced
1-2 tbsp ICE COLD water

This recipe is a little bit different from my shortcrust pastry because it has sugar in it, Betty said that it's nice to put a bit of unexpected sweetness in it, because it's just usually salty.

If you have a food processor, which I FINALLY OWN!!! I recently bought Philips 700w Hand Blender, wait for my review on it, you can just throw the flour, sugar, salt into it then pulse it a few times just to mix, then throw in your 6 tbsp diced butter then pulse.  You'll know you're done if the flour-butter mixture is now yellowish and looks like breadcrumbs.


If you do not have a food processor, worry not, you can do it the way I did my shortcrust pastry, by hand!  All you need to do is press the butter into the flour.  Make sure to coat the butter with flour first so it won't stick onto your fingers, just keep doing it and you'll see it's going to come together at the end.  Warning, your thumbs are going to be really sore after this. haha   You can now drizzle a tablespoon of ICE COLD water and start mixing it with your hands until all the crumbs come into a ball which will become your dough.  Start pressing the dough using your fingers and palm onto the pie plate.  Then form the fluted edge, but you can also use a fork and press the edges down.  At this point, you have to REMEMBER (because I forgot, I only remembered when I was peering into the oven and my pie crust was breathing!), to puncture several holes on the pie crust with a fork, because when you bake the crust, it will need air pockets to release the steam, and if you didn't do that, then it's going to form a big bubble and stay that way instead of just flat.

Then bake the crust for about 10 minutes @ 425F, but I suggest you watch it and check on it every 2 minutes just to make sure, that's how i found out that I forgot to puncture holes on the crust.  Also take note of the fluted edge, because the higher the peaks, the easier it burns.  See my not so pretty pie crust. haha  I didn't do a good job flattening the dough evenly and so the middle was too thin and burnt quickly.


Have fun and watch out for my meringue and lemon filling entry!


Hi Hi Lemon Meringue Pie (Lemon Filling)

My Lemon Meringue Pie Crust post might have brought you to this second part of making the pie, the lemon filling!  Of course, I still used Betty's To Die For recipe for this and here's what you need:


3 egg yolks (save egg whites for meringue, leave at room temp)
1 1/2 cups cold water
1/2 cup lemon juice*
1/3 cup cornstarch*
1 1/4 cup sugar

3 tbsp butter
2 tsp white vinegar
1 1/2 tsp lemon extract
Pie Crust
Meringue

Firstly, you have to prepare the double broiler, and boil the water underneath.  Mix together in a bowl (that will go above the double broiler), water, lemon, cornstarch, sugar.  Mix well and continuously over boiling water until it thickens and comes to a boil.  If you feel like the mixture isn't thickening up, you'd probably need to add more cornstarch, BUT WAIT! don't add the cornstarch directly into the hot mixture!  Dilute the cornstarch in a bit of cold water first, then mix it into the bowl, stir constantly until desired consistency is achieved.


Then immediately pour on top of the pie crust and smooth it out with the back of the spatula or spoon.  Now next up is the meringue!


Hi Hi Lemon Meringue Pie (Meringue)

Now remember we saved the egg whites from the lemon filling, it's not going to go to waste!  Meringue by definition means

meringueDefinition from Answers.com


www.answers.com › Library › Food & Cooking - Cached
meringue ( ) n. A topping for pastry or pies made of a mixture of egg whites and sugar beaten until stiff and often baked until brown.

So here's what you need:

3/4 cup water
1/4 cup + 2 tbsp sugar
1 tbsp cornstarch

3 egg whites, at room temperature
dash of salt
1 tsp vanilla extract

In a small saucepan, combine water, sugar and cornstarch.  Stir until blended.  Place over medium heat and cook, stirring constantly until transparent and thickened.  You will really notice that the mixture will become clear, because it will start out white.  Make sure to stir, stir, stir!


In a large mixing bowl, combine 3 egg whites and a dash of salt.  Beat with electric mixer until frothy (like foam), then mix in the vanilla, DO NOT OVER MIX.


Continue beating while gradually pouring cooked syrup into egg whites.  Beat 3 minutes, or until stiff.  DO NOT OVER BEAT!  Betty said to just aim for 3 minutes.

Spread over the top of a cream pie and bake at 425F for 5-8 minutes.  I suggest you to continuously watch the pie as it browns to see if it browns evenly, maybe you will have to change the position of the pie to make sure it doesn't burn.

That's it! from your Lemon to the Meringue to the Pie! Have fun! :D


Monday, July 11, 2011

Chewy Chocolate Chips

Rainy days call for comfort food... what is more comforting than a batch of chocolate chip cookies fresh from the oven?


I am trying Michael Smith's recipe for chewy chocolate cookies
the results of my efforts
For this you will need:


1 1/2 cups flour
1 tsp baking powder
1/4 tsp salt
1 stick of butter (1/2 cup, half of a regular block)
1 cup brown sugar
1 tbsp corn syrup
1 egg
1 tsp vanilla
1 cup chocolate chips


preheat your oven to 375F. whisk the flour, salt and baking powder together. Set aside. Cream the butter and sugar together until smooth and creamy. Add the corn syrup, egg vanilla and continue beating until well combined.
Scrape down the bowl and gradually add the flour mix, beating until combined.Stir in the chocolate chips


Using a spoon, scoop out a ball of the dough and drop onto a lightly greased cookie tray (you can use oil or cooking spray). flatten slightly. Leave spaces between balls for the cookie to expand. Bake for 12-14 minutes (when the edges turn slightly brown). cool on a wire rack


And to enjoy it.. just get a glass of milk and chomp!~ Hope everyone tries this!


Saturday, July 9, 2011

Carlito's Way Tilapia (with Tomato and Corn Bruschetta)

After baking all those sweets, you have to get yourself a healthier lunch option. One of these is eating fish.


The original recipe is from Clean Living magazine. I tweaked the recipe a little to suit my family's taste.


For the tilapia fillets, you can ask the local fishmonger to fillet the tilapia for you or you can buy tilapia fillets  in the supermarket.


you will need:


2 slices of bread (pan or italian bread)
2 tsp olive oil
2 cloves of garlic
3 medium tomatoes, chopped
1 cup frozen corn (or canned)
1/2 cup basil leaves, chopped
olive oil
4 boneless tilapia fillets
dash of ginger powder
3 tbsp lemon juice (or calamansi juice)
salt
pepper


The original recipe called for italian bread. i only had loaf bread so I had to make do. It also had olives (I hate olives) so i omitted that part of the recipe


brush bread with olive oil and rub with garlic (basically making garlic bread) - you can also chop the garlic and let it sit in the olive oil before you brush the bread with it. Toast in toaster oven, chop into cubes and set aside.


Combine chopped tomatoes (preferably take out the seeds), basil, corn in a bowl.


Prepare the fillets- salt and pepper them on both sides, sprinkle a little ginger powder on them, a little of the lemon juice and them position them on a greased baking pan. broil them in the oven for about 10 minutes or until flaky.


As the fillets are broiling, finely chop garlic and saute in pan with olive oil. Stir in the tomato mixture and heat about 3 minutes.
--- by this time, you can smell the garlic, tomatoes and basil.... YUM!


toss in the chopped bread and mix. season with salt and pepper to taste.


Position fillets on the plate and top with the tomato/basil mixture.


I had this dish as my lunch. It was quite refreshing to taste the sweetness of the tomatoes with the fish. The bread gave it some body too. The only thing was that the fillets I bought were a little small. If you are serving men, I think one fillet will not satisfy him! hahaha. and the best way to eat this is to get some bread, fish and tomato in one fork. It's like eating a fish sandwhich.


This only has 294 calories! and I think you can try to use other kinds of fish fillets if you like. this one will be great for the dieting foodie!


Enjoy!