Wednesday, August 31, 2011

Sizzling Beef Salpicao

It's been awhile since we posted a savory recipe. So I decided to try this one I got from PANLASANG PINOY website. I added the sizzling plate to give it more oomph at the end. (anything sizzling seems to have more appeal... hahahaha)


For the novices out there, this is actually very easy to make and is great as pica-pica for beer or a main dish for the family. All you have to do is marinate the meat and you are good to go.

Sizzling Beef Salpicao

1 1/2 lbs beef sirloin (or tenderloin), cubed (I sliced mine)
3 tablespoons garlic, minced (you can use more if you like)
1 teaspoon salt
1/8 cup butter
3 tablespoons olive oil
1/2 teaspoon ground black pepper
5 tablespoons Worcestershire Sauce
2 tablespoons oyster sauce

1. Combine the beef, salt, pepper, and garlic then mix well. Let stand for 10 minutes.

2. Add the olive oil and marinade for at least 30 minutes.

3. Apply high heat on a pan then put-in the combined ingredients once the pan is hot enough.

4. Sear the beef until the color of the outer part turns brown. Try to toss the beef while searing so that all sides are uniformly cooked.

5. Add the oyster sauce and Worcester's sauce and continue tossing until the liquid dries up.


heat the sizzling plate (if you have one), if you don't, then you can skip this part.  Add the butter in the last 30 seconds and serve.


I found that serving this in a nice plate with the rice formed into something served in restaurants is very appealing to kids. My daughter wanted hers served like this too and enjoyed eating the food (compared to just a plain plate and messy rice)

So I guess presentation REALLY gives the dish added yummy points. They even ate the side dish of steamed broccoli. My husband thought this would be great if we added more toasted garlic on top. (you can pre toast your garlic before hand )-- so maybe I'll do that next time I cook this.
Publish Post

Wednesday, August 24, 2011

The RADDEST Radish Cake


If you are a regular at dim sum restaurants (which are pretty plentiful here in Manila), you would have probably tasted radish cake. It is one of our favorite dim sum dishes.
A good radish cake is composed a nice shredding of radish and a nice toasty exterior.


Most commercial radish cakes sold in the market scrimp on ingredients (mostly composed of rice flour than anything else) So, for those who crave a nice full bodied radish cake, here is my SECRET recipe.


dried mushrooms, chinese sausage and dried shrimp are available in chinatown (in whatever country) It is one of the most basic ingredients of chinese cooking. 


The dried mushrooms need to be reconstituted in hot water for about 5 minutes before you chop.


You'll need:
1/2 cup of reconstituted dried mushroom, chopped
1/2 cup chinese sausage, chopped
1/4 cup dried shrimp, reconstituted and chopped
3 lbs radish
2 tsp salt
2 cups rice flour
2 cups chicken stock (or 1 tbsp chicken powder in 2 cups water)+ 1 cup water


Peel and grate the radish. simmer in water for 15 minutes till soft. remove from pan and drain.
meanwhile, stir fry mushrooms, dried shrimp and sausage in pan for about 2 minutes, remove and add to the radish..mix in the chicken stock and rice flour. -- you can adjust the consistency of the mix by adding some more water --
it would look like this...


put into a container, cover with foil and steam for about 1 hour.  cool and put in the fridge overnight or longer. (I used a plastic take out box- it would make it easier to give to friends)


to serve, cut the pieces and panfry until really toasted.-- I cut mine into two because I made them thinner. If you make yours thicker, you can cut it lengthwise and then crosswise to get the desired thickness.  (the bottom of the container had indentations...)


toasty!!!!


notes:
use only rice flour and NOT glutinous rice flour. using the glutinous kind would make the radish cake too sticky.-- I did this when I first tried this recipe and it did not turn out good. It was REALLY gooey.


I find that letting the radish cake sit for two days in the fridge makes it better ( both for cutting and frying). do not cut the radish cake too thin, you might have a hard time pan frying it. I know you would want to try it as soon as it comes out of the steamer, but believe me... its really better chilled at least 1 day. This is nice to keep in the refrigerator for those "emergencies" when you crave for some luscious snacks and bread just won't do.


Enjoy!

Saturday, August 20, 2011

Banana cupcake with Mocha frosting

I love cooking and feeding my friends and family. This has taken on a new level when we started blogging about what we were cooking. Some of my friends started making special requests. One of these was for a banana cupcake. I didn't want to make a plain one.. I actually wanted to fill this one with some kind of filling but in the end got too lazy to punch the holes for the filling. I ended up making them with just frosting on top.

As I mentioned before, bananas are available here year round and can be acquired any time and at minimal cost. So making these are not that difficult.

You can see from the pictures, my frosting ability has improved a bit. But still... I want to achieve a nicer looking cupcake. i guess practice makes perfect. (need to practice more)


1/2 cup shortening (like CRISCO vegetable shortening)
1 1/2 cups sugar
2 eggs
1 teaspoon vanilla extract
1 cup mashed ripe bananas *about 3 bananas
1/4 cup milk
2 cups cake flour
1 teaspoon baking powder
3/4 teaspoon baking soda
1/2 teaspoon salt

FROSTING:
1 cup whipping cream (pour and whip brand is the best)
2 tsp instant coffee diluted in 1/4 cup water

Directions


In a large mixing bowl, cream shortening and sugar. Add the eggs, vanilla, bananas and milk. Combine the flour, baking powder, baking soda and salt; add to banana mixture. Fill 18 paper-lined muffin cups two-thirds full.
Bake at 350 degrees F for 15-20 minutes or until a toothpick comes out clean. Remove to wire racks to cool completely. In a small mixing bowl, whip cream till stiff peaks and add the coffee granules diluted in water midway.  transfer to bowl and cool in fereigerator for 10 minutes till piping consistency. (the whipped topping might be too soft to pipe.  Frost cupcakes.

Frosting: whip the cream in a mixer till light, slowly pour the coffee until well mixed and double in volume. ~ I use pour and whip (available in UNIMART or maybe landmark).. this non dairy cream is whips nicely than regular cream and is already sweetened so you don't need to add more sugar. If you are going to use regular cream, make sure to chill it first in the fridge before whipping-- it will whip better. Also, add some powdered sugar to the cream - if using regular (about 1/4 cup) to make it taste more yummy.


MOIST!!!
Notes:

you can substitute regular flour for cake flour, but the cake flour adds more fluff to the cupcakes. This is also the first time to use shortening to a cupcake recipe. Less fat and not a lot of difference in the taste- I think.

Make sure the cupcakes are cool before attempting to frost.... or else the frosting WILL RUN and MELT.

I used whipped cream frosting here because I really didn't want to use a buttercream frosting. It just seem so caloric. The coffee added a lot of dimension and blended well with the banana in the cupcake. a really nice combination.

If you don't have a decorating tip, you can use a ziplock bag, just snip the end off, fill the bag with frosting and squeeze.

Thursday, August 18, 2011

The Awesomest Best Burger in the Philippines

If you are one of those people who tries the same dish in different restaurants, then you're alot like me.  I eat Pesto Pasta in Italian Restaurants to compare, I look for the best Bibingka, and I also look for the BEST BURGERS!

Ok, let's talk about burgers.  As easy as burgers are made, like human beings, they're not all created equal.  Some are yuck, some are tough, some are gross, some are just AWESOME!

Ladies and gentlemen, let me introduce you to Charlie's Burger.


So who is Charlie? Charlie's Executive Chef Robby Goco of Cyma fame decided to name their restaurant after Charlie Nagreen, a.k.a. "Hamburger Charlie", known to be the American inventor of the 'portable meatball' which he sandwiched in white bread. And so, the burger was born. (@Click the City)

Charlie's burger's first branch is located in Kapitolyo in Pasig.  It is a burger joint and a car wash.  You would never expect a place whose supposed business is car wash to serve delicious food;  but now people pay for car wash so that they have somewhere to park to eat at Charlie's!  They've finally opened a branch in the North located in Ortigas Avenue near corner of Santolan.  

Charlie's burgers are cooked as you order and they are just MADE TO PERFECTION.  I could not be anymore enthusiastic about burgers because this MAY be the best burger in the world.  Ok, I've not been to the USA but my sister has! and she said she thinks it's better than In and Out!  (We stand to be corrected); BUT! If we are talking about the Philippines, you will not find a burger place, better than Charlie's.

Can I be any clearer than that?


I've tried other burger places, I even tried that burger place in Baguio where they claim they have the best burgers... I tell you, they're not.  Ok, Brother's Burger, they got good burgers, they're good quality, but YOU'RE A BURGER PLACE!!!! WHY DO YOU CHARGE FIVE PESOS EVERY SACHET OF KETCHUP? You shouldn't have to pay for ketchup for cryin' out loud!!!  

In Charlie's they have towel tissues all you want to use, they have Heinz Ketchup, mayo, mustard, horse raddish dressing, heavenly Aioli dressing EVERYTHING FOR FREE!

If you're on a diet and you deprive yourself of complex carbohydrates like potatoes... well if you want to cheat, do it the right way!  OMG the awesome potatoes, fried to perfection. <sniff>

The right American way to eat a burger is definitely to just dig in with your hands, no utensils -- cave man style!  It is indeed the best way to enjoy this burger!  Smother yourself with ketchup and other sauces.

Writing this blog post is making me drool and crave for Charlie's Burger.  To give you some reference on how I can describe this awesome burger, here are some quotes form How I Met Your Mother (Season 4 Episode 2):


"I just had my first burgasm!"
"I want to get this burger pregnant"
"I wanna have dibs on those burger babies!"


"I love this burger so much I want to sew my ass shut!" 


Wednesday, August 17, 2011

Apple Turnover


My son LOVES the apple pie we buy in Mcdonalds. those little turnovers with the cinnamon apple inside. He could eat 2-3 in one sitting. So, for the sake of making some at home, I tried making these turnovers. He once asked me to do a WHOLE apple pie. (from scratch!) and he didn't even eat any of it. ( I guess my kids love to see me hard at work in the kitchen.. those little devils!)

The good news is...He loved it!! (hip hip hoooray!!!!)  and it's not as hard as you think. You just have to buy frozen puff pastry. It's available at SANTIS deli. click HERE for their store locations.

The one package of puff pastry I bought actually had about 8 pcs of square pastry you have to separate. I used only about 2 of these. (you have to put the rest back for future use, any puff pastry defrosted cannot be refrozen).

For this you'll need:

2- 3 apples, cored and sliced into cubes
1/3 cup of sugar
1 tbsp of lemon juice
1 tsp of cinnamon
1 tablespoon of cornstarch
frozen puff pastry (thawed as per package instructions)
this is what I bought

each pack contains 8 pcs... you can easily separate the layers

In a saucepan, combine all the ingredients (except the puff pastry) and stir till the apples are soft and the sauce is thick. The apples will give out some juice so don't worry if the dish looks dry at first.
cool. You can also put this in the fridge for a few minutes before you put it in the puff pastry. I tried doing it fresh from the stove and the juice went all runny and I had a hard time sealing the pastry.
 (check the sauce when you simmer the apples, it should become thick, if not, add a little more cornstarch... if it becomes too thick like paste, add some more water. It should have a fair amount of juice that is neither runny nor pasty)

this needs more cornstarch.... it should be THICKER

Preheat oven to 200C (400F)

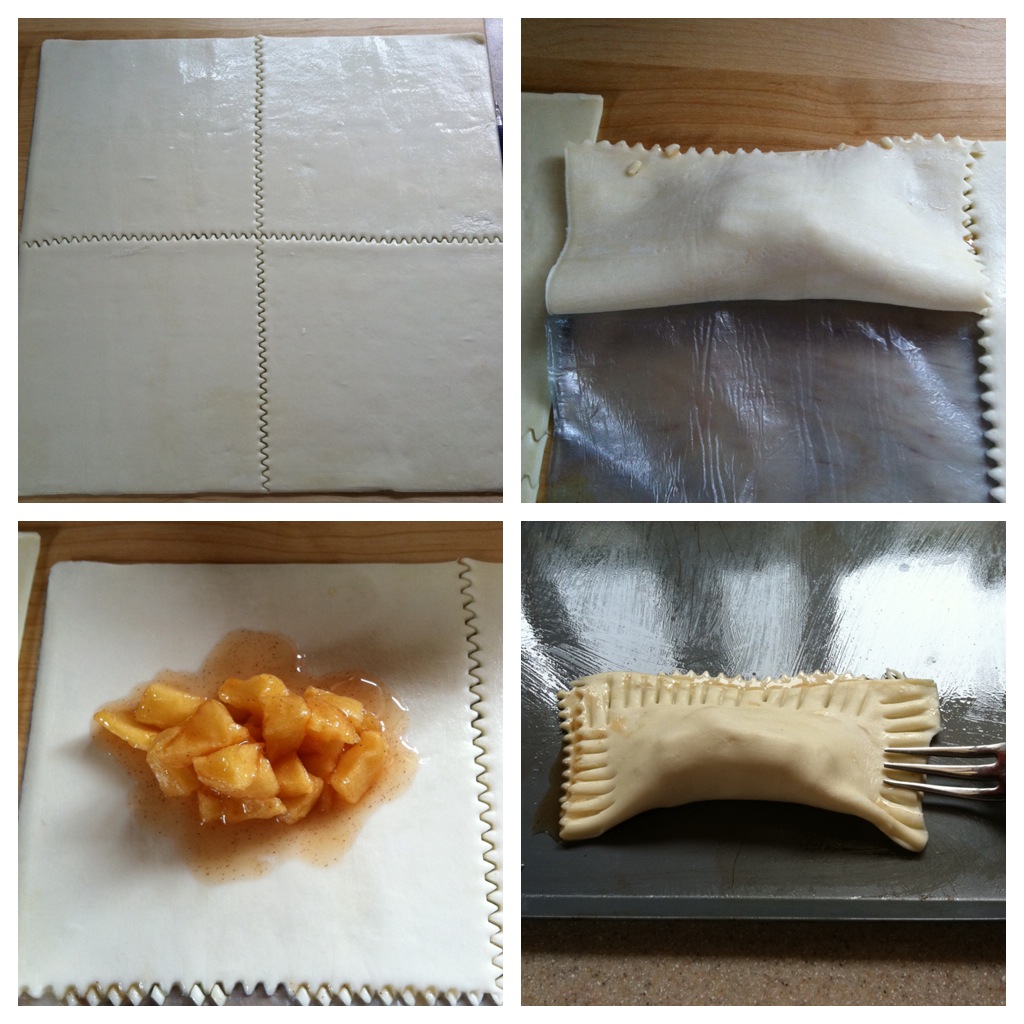
place the puff pastry in a cookie sheet lined with wax paper , divide the sheet into 4 squares. Put the filling in the middle and fold over. (as I said, it would be best if the sauce was thicker), if it's not, the sauce will squish out of the pastry when you try to seal it. Try to fill the pastry as much as possible. and seal with a fork. (lower right pic)

The lining of the cookie sheet with was paper will help you put it in the oven and not move it after you filled it. It also helps with the sauce clean up if it happens to come out when cooking.
the apple in the lower pic has a runny sauce..
bake in a 200C oven for 25 minutes or till golden brown.


The puff pastry really did puff out a lot that when you bite into it, its came out really flaky (like a croissant actually). The only complaint is that I can't really FILL it to the brim. The puffing of the pastry adds air pockets and when you bite, feels like the pastry is not full. (in actuality, you tried to fill it )

What I loved about this is that I can make it anytime without the hassle of making my pastry from scratch. I just need to defrost pastry for 5 minutes at room temperature, do the filling and VIOLA! fresh turnovers!

Some recipes call for a glaze (consisting of sugar and milk)  but I opted to skip this step. We don't really like the added sugar. If you love apple pie... here is one recipe you can make and not worry about leftovers... there won't be ANY!


Friday, August 12, 2011

Profiterole-ing in the Deep

The first time I've ever heard of Profiteroles was in Junior Masterchef Australia, I thought to myself, "dang these kids! Profiteroles must be really hard to make!" I couldn't be any more wrong. Profiteroles or cream puffs are actually really easy to make!


Here's what you will need:

This recipe will yield 12 pcs.

4 cup of water
1 stick (113g) of butter (unsalted)
1/2 tsp salt (skip this if butter is salted)
1 cup all purpose flour
4 pcs eggs at room temperature

The instructions said to preheat oven at 400 degrees. I found out that 400 degrees in my oven wasn't hot enough, I had to increase it to around 480 to get the profiterole batter to be even a bit excited.

For the batter, put the water, butter, and salt in a medium saucepan and bring to a boil over medium low heat. Remove from heat. Add the flour all at once and stir well with a wooden spoon until the flour is completely mixed in. Turn the heat back on to medium heat and cook, stirring constantly for 2 minutes. Scrape the dough into a large bowl.


With a whisk or wooden spoon, beat in the eggs one at a time until all four eggs are well incorporated. Spoon the dough into 12 rounded mounds onto the prepared baking sheet, the size is around the size a bit bigger than a ping pong ball maybe? and it'll pop up to the size of a tennis ball. Dip your finger into a little water and smooth out the edges to make sure that no small bits burn.


Bake them for 45 minutes and let cool for 30 minutes before filling!
To watch how to make it, because it was difficult for me to cook and be the photographer at the same time; watch the video by Laura Vitale!

Profiterole Custard Filling

After i finished my profiteroles, I knew I had to put something on or in it.  I didn't have chocolate and wasn't sure to how make sugar glaze yet so I thought of making custard.

You will need:
This will yield 1 cup of custard

1/4 cup sugar
1 cup milk
2 tbsp cornstarch

2 pcs eggs beaten
1 tsp vanilla

Put sugar, milk, and cornstarch in a sauce pan and CONTINUOUSLY stir over medium heat until smooth and THICKENED.  Trust the cornstarch, it will thicken.  DO NOT leave your saucepan unattended.

Next is to beat the eggs very well in a bowl, then set aside.  After the sugar-milk mixture thickens, you need to temper the egg with it.

What is tempering?
Tempering is preparing the egg for the hot temperature it's going to receive. Instead of pouring the whole mixture into the eggs, which will cause the egg to cook, and make it look like scrambled eggs, you slowly introduce the heat to the egg.

After you've tempered the egg, pour in the tempered egg back into the sauce pan and stir / scrape CONTINUOUSLY until mixture is thick and coats the back of the spoon.  Take off from heat.

After this step, mix in the vanilla thoroughly.

Place the thickened custard onto a plate.  Cover directly on top of custard with cling wrap to prevent the top forming skin when you refrigerate.  Let it set, I'd say at least 3 hours or until completely cool.


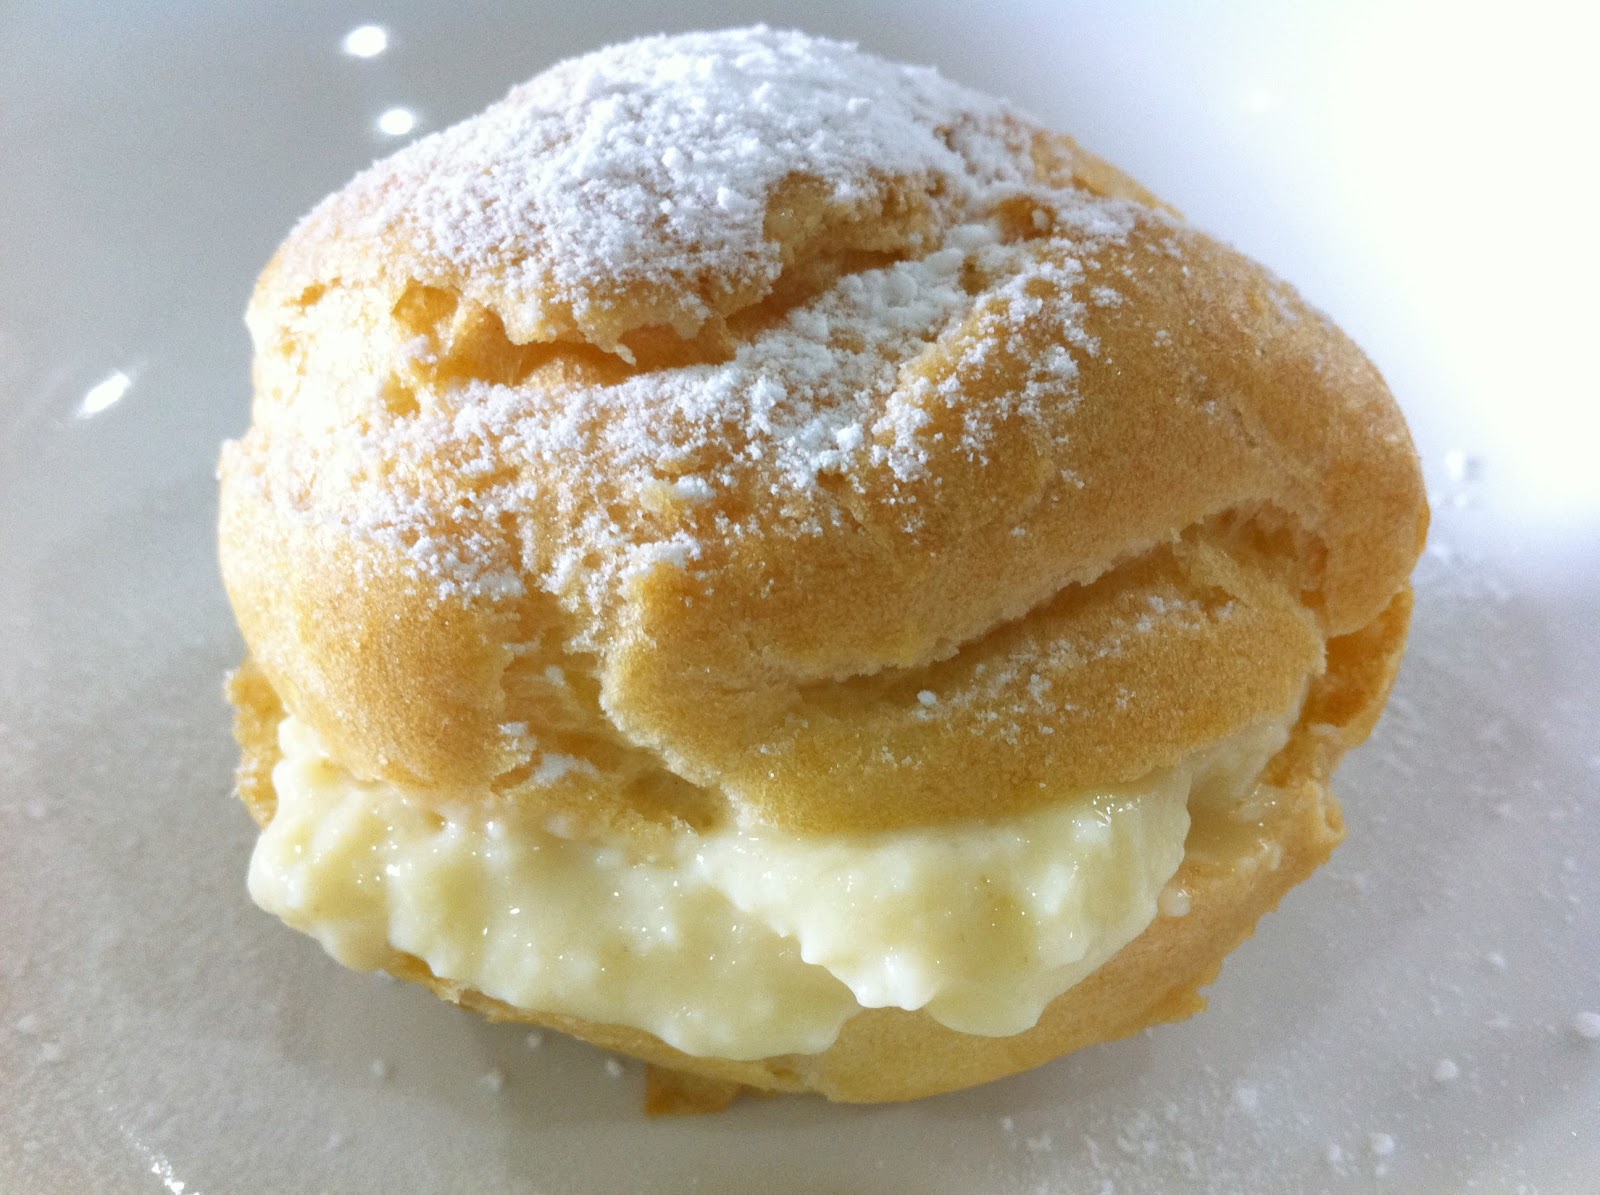
Slice profiteroles in half and fill, dust with powdered sugar.


Wednesday, August 10, 2011

Toffee Brownies

So, I have been doing a lot of desserts lately. I find desserts are easier to do because I usually have most of the ingredients on hand compared to savory dishes. I also can do part of the recipe first and come back to finish it later in the day-- as with this toffee topped brownie.


I did the brownie in the morning before I went to work. I mixed the batter and asked someone to take it out of the oven when the timer rings while I took my shower. Left it to cool and returned later that day after work and ate dinner. Mixed the frosting and topped it before transporting the cut brownies to serve at our weekly Bible Study meeting. (yeah, I do go to Bible study!)


You'll need:


6 ounces unsweetened chocolate, chopped
3/4 cup unsalted butter
4 tsp. instant coffee powder
4 eggs (room temp)
2 cups sugar
1 1/2 tsp vanilla extract
1/4 tsp salt
1 cup all purpose flour


TOPPING:
1 block cream cheese (room temp)
2 tbsp whipping cream
1 1/2 tsp vanilla extract
6 tbsp powdered sugar
1 1/3 cup almond roca, chopped (I didn't have any so I used snickers bars)


This actually does not require a mixer... I did the batter by hand using a wire whisk.


Preheat oven to 350F or 180C. butter and flour a 13 inch square baking dish.


melt the chocolate, butter with expresso ---place a bowl over a  sauce pan with simmering hot water. slowly whisk it until it melts into a smooth consistency. (careful with the bowl... it may be hot!). cool slightly.


Whisk the eggs in a large bowl. Add vanilla and salt. Whisk in melted chocolate. Add flour and stir until just blended. Spread batter into a prepared dish . bake for 30 minutes or until toothpick comes out clean. Cool before frosting.


for the topping:


blend cream cheese, cream and vanilla (you can use a hand blender or just a whisk----important the cream cheese is at room temperature for better blending) until smooth. Mix in sugar.


spread topping over brownies. sprinkle with almond roca or snickers.


VERDICT:


This recipe is not for a dieter... for sure!  The brownie was just the right sweetness and the cream cheese topping added a new element because it gave it a sour after taste. The snickers topping was a nice surprise when you bite into it. Nutty and sweet. Some of those who tried it were asking about the topping.... how did I make it? it was sooo yummy.....! hahaha (I whispered it was snickers bars)


It is also easier if you refrigerate the brownies first before you serve. The frosting will become easier to handle.  (it will not be so runny)


This one made me think of the Goldilocks and the 3 bears... the topping was sweet, the cream cheese a little sour and then the brownie was JUSSST RIGHT.....