Monday, August 6, 2012

Parmesan Chicken

Sorry if the pictures don't do this dish justice. Can I say this was delicious? Yeah it was. Juicy too!
I was having friends over for lunch and I thought of trying this recipe I got from my BON APPETIT cookbook (w/c I can say, is really superb!)

Ingredients:

3 cups white breadcrumbs
1 cup grated Parmesan cheese (or cheddar)
6 tbsp chopped fresh parsley
4 tbsp onion powder
1 tbsp paprika
1 tbsp dried oregano
2 tsp salt
1 1/2 tsp ground pepper
1  cups butter
1/3 cup Dijon mustard
24 drumsticks

Preheat oven 350f/180c
Butter or spray with non stick a rummed baking sheet
Combine breadcrumbs, parsley, onion powder, paprika, oregano, salt, pepper in a large bowl

Melt butter in small saucepan . Remove from heat. Add mustard and whisk to blend.

Brush drumstick with butter mustard mixture , roll in breadcrumb mixture coating drumsticks
Arrange in baking sheets

Bake until golden and cooked through about 1 hour. Serve warm or at room temperature

I didn't have time to take a picture of the inside but boy... was it really juicy. smelled divine as it was cooking too. I served it with the the basil pasta I made and whopper lunch!! I guess the breading and the roasting kindda kept it really moist (compared to if you fried it)

The parmesan taste really gave it a kick (although parmesan is expensive)- you can substitute with cheddar I guess but I don't know if it will taste the same. Save the parmesan for special occasions to WOW your mother in law or something... hahaha.

enjoy!!


Saturday, August 4, 2012

Migliori coffee maker

I admit, I am a HUGE coffee drinker. I love to drink coffee that I ordered a refurbished Delonghi machine from ebay (after much much searching) and had it shipped (it was 1/4 the price of a new one).

The Delonghi machine is quite large (I get a lot of milage since I use it everyday and you can put both beans and ground coffee in it). In the office, it would be impossible to manage (too big and expensive)

Good thing a friend offered me this MIGLIORI (also italian made). The price was cheaper than other pod based machines I have encountered


One thing I like about it, it's small (check). User friendly (check) and the pods are not so expensive (check). I can serve my customers coffee. !--- you can see I bought paper cups (not styrofoam)

The pods are also environmentally friendly (you can compost them, as what I do with my coffee grounds at home) and they are not package in foil.


One of the deterrents in buying a "pod" based coffee machine for me is the availability of the pods. Some you have to buy from abroad (imagine having a machine with no pods) and buying pods that cost 40 pesos each ($0.98). This one however, got me at.... Philippine barako (yep, they have local pods) and the price is, at the most 30 pesos for the hazelnut one. For the office, I think this is a good buy since I usually get my coffee from Mcdonalds at 25 pesos per cup (and this is DRIP coffee..not expresso)

see the froth...  (ooh yeaaah)

TIP: I can get TWO cups of coffee from one pod.. (it still has froth the second time you use the pod).. also, you can put teabags on the machine and get  tea too!!!

This machine also comes with a milk steamer (I don't have a fridge in the office so I don't use this). The flavors I like are the french roast and the hazelnut. (really aromatic!)


The Philippine coffee pods will be available within the month I was told and I can't wait to try it.

If anyone is interested, they can do a DEMO in your home or office. call (0932) 857 0462.
For the pods, they can deliver to you if you order 1500 worth. (you don't have to search high and low for it)


disclaimer: I don"t own any part of this company... I am just reviewing it.. 


Wednesday, July 25, 2012

I'm Back! Backpacker's Gourmet

Hi everyone, for those who do not know me, I am the other lady on the spoon that the blog title was named after, Candie.  I am the prodigal lady-on-a-spoon that has been M.I.A. for almost a year! (Sorry Imelda! :P)


Well, I have been busy with a lot of different stuff, one of which was filming an online web show / webseries / webisodes about FOOD!  So I have not totally abandoned this blog, or at least the essence of it.  It was Imelda who betrayed the foodie community, going on a diet; cooking and yet, not eating! (Que Horror!).  She recently lost a significant amount of weight, read about her success here.


Anyway, to tell you more about it, the show is produced by Dispatch Magazine Online.  It is the magazine that is being distributed in R.O.X. in Boni High Street and now independent and made available online.  


They decided to make a web series that tapped on food and travel.  I was very lucky to have been chosen as their host for the show called Backpacker's Gourmet.


Backpacker's Gourmet is a show that is going to scour through Metro Manila's best culinary gems with a budget of only Php150 per meal!  You will be surprised how many hole-in-the-wall restaurants there are that serves incredible food.


For the first series of the show, we are tapping into Lutong Pinoy.  We're gonna go around restaurants that serve Filipino food, one city at a time. Each episode showcases a city and every episode will be chopped into several parts. 


...and with all that clarifications, without further ado, here is the first part of my first episode!!!  


This was shot in 2 days, went to around 8~10 restaurants.  You can imagine how FULL I was haha...Yes, my job is really stressful.  I am still getting used to seeing my face on the camera.  I definitely have a lot to work on in terms of information I impart and definitely have to work on additional adjectives on how to say "delicious".  My experience as a tour guide definitely helps when it comes to projecting my voice and some tidbits but then again, talking to a camera and a live audience is very different.  I will blog about all the restaurants I visited after the end of every episode just for everyone's reference :)


Thanks for reading all the way to the end and I hope you enjoyed the video!  Please like Backapacker's Gourmet on Facebook to be updated on the future episodes! :D

Monday, July 23, 2012

The Lady is a WEb Host

One of the ladies has taken on a new (additional) job... and it's web hosting a show on youtube!!!

Check out Candie's first episode.-- watching her eat is actually making me hungry...


Good job Candie!!!-- I'm guessing I'll be cooking by myself for awhile while you eat your way though Manila.... =)

Wednesday, June 13, 2012

Hoisin chicken

If you are a parent, you might be looking for something other than fried chicken and fried spring rolls to serve your kids. I tell you now... THIS IS IT.

I have been doing a lot of baking recently and decided to have a go at a chinese recipe I got from my new book. Aside from being easy, this turned put perfectly succulent and got raves from my kids. (w/c some of my dishes do not- picky eaters that my kids are)

You can marinate this before leaving the house and roast it when you get back for a quick dinner.


Ingredients
1/2 kg chicken thighs or legs
1 scallion or leek (for garnish)

Marinade:
1 tbsp shaoshing rice wine or dry sherry
2 tbsp hoisin sauce
1/4 cup light soy sauce
1 tbsp dark soy sauce
1 tbsp light brown sugar
1 tbsp peanut oil
1 inch fresh ginger, peeled and grated

Place all ingredients in a bowl and add chicken pieces. Toss and cover with plastic wrap and let marinade in refrigerator for 20 mins (to overnight)

Preheat oven 350f/180c

Remove chicken and roast in roasting pan (or you can use a turbo broiler) for 30 mins or until cooked through

Just before serving, pour marinade into small saucepan and boil. Drizzle over chicken , garnish with sliced leeks and serve with rice

So, how easy was that? I tell you... this is finger licking good.!!!


You can double the recipe (or triple it) if you have guests coming over... or even freeze pre-marinated and have something to whip up in a jiffy. Something so easy you'll serve this over and over again!

Saturday, June 2, 2012

Meat Filled buns

One of my favorite things is meat filled buns. Particularly bbq pork buns. there is such a fullfullment to know you can make your own bread. It's not the easiest thing to do. (because you really have to invest the time to wait for the dough to rise) but smelling them coming out of the oven and seeing them all golden is heaven!!!


you'll need:

2 tsp instant yeast  (if you are buying packets, 1 packet is 2 1/4 tsp)
1 1/8 cup water
4 1/2 cups all purpose flour sifted (reserve 3/4 cup.. for adding to batter gradually)
1/2 cup sugar
1/2 tsp salt
3 egg yolks
1/4 cup evaporated milk
1/3 cup butter (1/3 of 1 225gram block)

egg wash (1 beaten egg)

filling

1. dissolve yeast in warm water. it should NOT be too cold or too hot or your yeast will die. If you have a thermometer, it should read 110C (lukewarm if you put your finger in it). set aside (about 5-8 mins) till it becomes bubbly

the yeast below has bubbled.. sign that you are good to go
2. mix 3 3/4 cup flour, sugar and salt in a separate bowl. when your yeast is ready, pour the flour mixture in. Use a dough hook (see picture) and mix at medium speed. add the eggs, butter and milk and mix again. If your dough is wet, add more of the reserved flour. By this time, your dough should be coming together to form something like a ball (left right picture)-- if it looks too wet, you can add flour 1 tbsp at a time

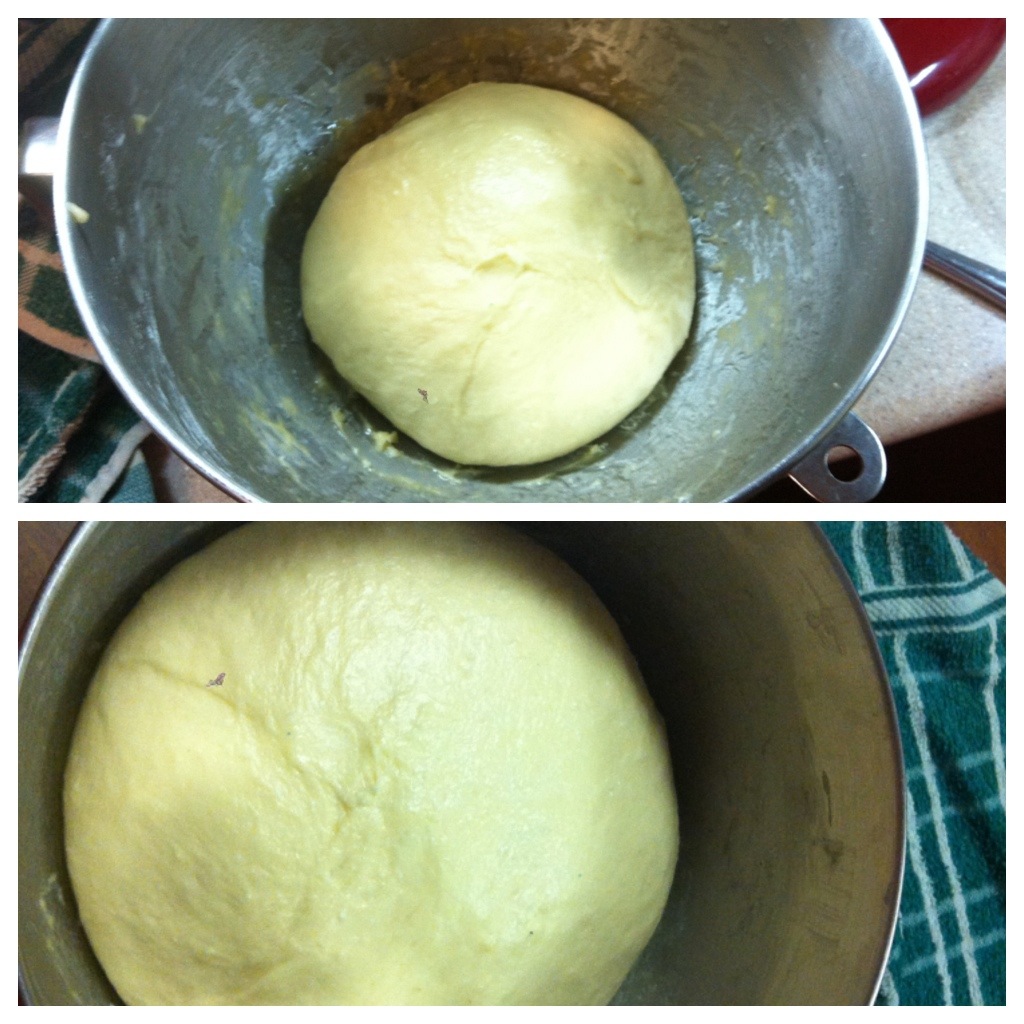
3. after about 5 minutes, the dough should be a little sticky but not dry. take it out of the  bowl and form into a ball. Oil the same bowl with a little oil (to save on washing a new bowl) and put back the dough. Cover with a wet towel and let rest until doubled in size (30 mins- 1 hour ). TIP: you can shorten the time by making a proofing area in your oven. take a bowl, fill with boiling water and put inside your oven. put the bowl with the dough beside it and close the door. check after 30 mins

doubled in size
4. punch down the dough and divide into 4 (for better handling). divide the 1/4 into sections and form into balls. (flour the work surface) using your hands or a small rolling pin, flatten it and put in your filling. (I ad leftover chicken adobo- taken off the bone and flaked/chopped). fold the sides and twist to seal.

5. put the sealed side down on a prepared pan (sprayed with pam or greased with butter/margarine). cover with wet towel and let rise again (30mins- 1 hour)


5. preheat oven 350F or 180C. when your dough has risen, brush with egg wash and bake in the oven for 15-18 minutes until golden


finished product
asado filling
You can actually put any filling you want. left over corned beef, bbq pork, ham and cheese. The possibilities are endless. Doing bread takes practice and patience. But the smell of it baking is something so wonderful to experience.

The rolls stay good room temperature for about 2 days. They are fluffy and soft. You can also actually make this without any filling at all. You can also opt to halve the recipe just to try it out at first because these make quite a lot of buns (unfilled)

The recipe is adapted from the Goldilocks cookbook (the proportions I found as per the cookbook, turned out a very wet dough -- something that would not form into a ball at all)

also, if you don't have a mixer with a dough hook, it would really take you quite some time mixing this to get to a solid dough. Maybe 10 minutes hand kneading. (knead it inside the bowl)

Hope you try this! enjoy!!!

Tuesday, May 29, 2012

Goldilocks cookbook review

I rarely do reviews. But in this case, I REALLY have to say something.


As a home cook and baker, I like to buy cookbooks and try them out. I have bought the martha stewart ones, some famous bakeries from the US ( FLOUR, TOPPOT, bon appetit).

Goldilocks has been a bakery institution in the philippines for so long. I love their butter loaf and my hubby is addicted to their caramel popcorn. So it was an easy decision to buy their cookbook.

One thing I can say by just browsing throught the recipes is that they were written in a very simple way (compared to a detailed one I have encountered elsewhere). So in trying some of the recipes, I have encountered these:

1. mislabelling of ingredients
in one recipe,( meat filled buns)  they indicated 1/2 cup of salt -- half a cup??? ( it think they meant 1/2 a tsp)

2. confusing instructions
they had ingredients in the list that were not used when you read the instructions.

another thing is when they instruct you (for the butter loaf) to put everything in with the eggs, flour and milk and then on the following line of instruction, they say to gradually put in flour and milk in alternate patterns (huh? i just put in everything like you said!!!)-- sheesh!!!


The book is so full or errors one has to wonder if they PROOF READ! I had to make notes on the side to try to adjust the recipe.

If you are a novice in the kitchen, this book will just make you frustrated. If you are a mid level cook, DON'T even bother buying this. You can find a better cookbook somewhere else.

The amount of flour- liquid ratio is wrong (in the meat filled bun) -- I'll have to explain on a later post. but this will NOT give you any of Goldilock like quality cakes. At least in the US bakeries, you get something better looking when you buy their cookbook.

What a big disappointment. EPIC FAIL

Tuesday, May 22, 2012

Pasta with grilled shrimp and basil vinaigrette

I had some guests over the weekend. I wanted a light dish but something flavorful too. I bought this BON APPETIT cookbook on sale at a local bookstore and was really itching to try something in it.

I had to adapt the recipe what what I had. I was also inspired by the spinosi pasta (they look like spagettini) I still had in the pantry. It was given to us when we attended a cooking class at a local hotel. the Italian chef demonstrated some pretty cool techniques on cooking pasta.


So with a block of PARMESIANO REGGIANO  (a small one... like 150 grams) off I went to find this recipe.

Ingredients:
4 prawns or 500 grams of shrimp. peeled and deveined
5 tbsp. lemon juice
1/3 cup olive oil
2 tbsp dijon mustard
3/4 cup fresh basil chopped
1 clove of garlic
salt and pepper to taste
2 tbsp butter

pasta if choice

parmesan cheese (1/4 cup)


1. combine 4 tbsp lemon and dijon mustard in a bowl. whisk in olive oil and basil. Season with salt and pepper. set aside

2. place shrimp in bowl and drizzle with 1 tbsp lemon juice and 2 tbsp olive oil. sprinkle shrimp with salt and pepper

3. grill shrimp (or pan fry) with a little oil until cooked. set aside. If using prawns, cut into bite sized pieces.


4. cook pasta in pot with boiling salted water until firm to the bite ( al dente) - do not drain pasta, (you'll need the pasta water if your dish is a bit dry)

5. while pasta is cooking, sauté the garlic in a pan (about 1 min), add the shrimp and pasta (scooped from the pot) - if the pan looks dry, add a little pasta water. add the lemon/basil mixture. butter and parmesan. toss till well coated.

Serve with some garlic bread. garnish with fresh basil.

My guest loved this dish. They said it was very light and flavorful for something that doesn't look like it has anything on it.
I thought it was like something out of a restaurant actually. A keeper for sure! (I just can't make this all the time since parmesan is quite expensive)

Enjoy!!!